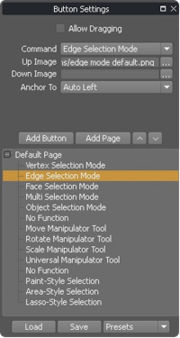
Button Settings
Default Shortcut: None
Menu Path: Editors/Options > Button Settings
Description
The Button Settings dialog allows you to customize Silo's on-screen buttons. Buttons are arranged in a series of "button pages", where each page represents a set of buttons which is on-screen at a given time. You can switch between these pages using various commands in Silo, or create buttons for those commands to allow switching from within your custom interface. There are also commands to completely hide or temporarily show the button pages, leading many interface designers to put buttons right in the middle of the screen and keep them hidden most of the time. The editor is designed to maximize customization, but also offers automatic alignment and default images if you just want to quickly add some buttons.
Any image can be imported and used as a button, with full support for transparency (using the png image format), offering a lot of freedom for custom designs. Each function also has a provided default image if you do not want to design your own.
Each button page is composed of a list of buttons. Choosing the value for Anchor To for each button or button page determines where each button will be aligned with respect to. For example, any buttons which are anchored to Auto Left will align themselves in a column on the left of the screen. In addition, each button can be assigned any image for its up and down states. This setup offers a large amount of control over the look and functionality of Silo.
The button pages are displayed in a tree-like structure. To add a button page or add a button to the current button page, use the Add Button and Add Page buttons. Use the up and down arrow buttons next to the Add buttons to move the current button or page up and down in the list. To edit the properties of a specific button or page, select it. To rename a page, double click on it. To delete a button or page, select it and use the Delete key.
Page Options
Anchor To
- Specifying an Anchor To option when a page is selected will assign that setting to all buttons in the page.
Persistent
- You may have interface elements which you want to be displayed regardless of which button page is currently shown (e.g. for a custom menu bar). Setting a button page to Persistent will cause it to be shown even as you cycle through others.
Options
Allow Dragging
- For any button which allows you to specify X and Y values, you will be able to move it by clicking and dragging on it in the main Silo window.
Command
- Here you can choose what function you want the button to perform. Note that there is a "No Function" in the command list, in case you want to add an interface element that shouldn't do anything when clicked.
Up Image
- The main image for the button.
Down Image
- If you like, you can specify an alternate image to display when a button is being clicked. For some commands, this image will be displayed while the command is activated. If you do not specify an image, the Up Image will be used.
Anchor To
- Buttons can be anchored to different areas of the screen. Options beginning with "Auto" will automatically separate and space all of the buttons anchored to that section. So adding several buttons and setting them to "Auto Left" will cause them to be arranged in a list on the left side of the screen.
- Options without "Auto" will place all buttons at the exact location specified. So adding several buttons and setting them to "Middle Left" will place them all directly on top of each other. You can then specify offsets from that location using the following two settings. If you are creating a custom interface with your own images, you may wish to use this option to more precisely align your buttons.
Position XY
- For buttons which are not automatically placed, you can specify an offset in pixels from the anchor position.
Anchor % XY
- For buttons which are anchored to Custom, you can specify the anchor location on the screen based on percentages. (So using 50% for both values would be the same as anchoring to Center, for example.) The Position XY values will then be used to offset from that point.
Notes
- Some users may wish to create a blank button page which can be cycled to, avoiding the need to toggle display of button pages on and off.
- This dialog uses Presets. You can add your own preset by copying a Silo preferences (.sip) file into the corresponding presets directory within the Silo install directory on your computer.
- When trading setups, be sure to include the image files for the buttons in a folder with the .sip file.
