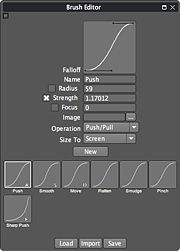
Brush Editor
From Nevercenter 3D Modeling Wiki
Default Shortcut: None
Menu Path: Editors/Options > Brush Editor
Description
The Brush Editor provides access to everything needed for Silo's displacement painting. Most users keep this window open whenever they are painting displacement.
Options
Falloff
- This editable curve defines how the strength of the brush will be distributed, with the right side representing the center of the brush's affected area, and the left side representing the outer edge of the radius.
Name
- Each brush can be given its own name for easy identification in the brush list.
Radius
- Determines how large of an area is affected by the brush. The radius will be represented by a circle onscreen whenever a brush is active. The checkbox allows you to specify whether this value is affected by pressure sensitivity.
Strength
- Determines the strength with which the brush's effect is applied. The strength will be distributed according to the falloff curve. The checkbox allows you to specify whether this value is affected by pressure sensitivity.
Focus
- Determines how far out from the center of a stroke the falloff will begin to be applied. With a value of 0, the falloff will look exactly like the falloff curve. With a value of 0.5, the brush will be applied at full strength until halfway out from the center, at which point it will begin to follow the falloff curve. The checkbox allows you to specify whether this value is affected by pressure sensitivity.
Image
- Instead of a falloff curve, the strength of the brush can be distributed according to a reference image. For example, an image of bark could be used in conjunction with Push/Pull to paint bark-like details on your model. Silo only uses lightness and darkness values, so the brighter parts of the image will correspond to a stronger effect of the brush.
Operation
- Here you can specify what sort of effect this brush will have on the model. Normally, artists will create multiple brushes and select an effect for each one, rather than using one brush and changing this value frequently. Effect names with a slash (such as Push/Pull) have an alternate effect which can be accessed by right clicking when using the brush.
Size To
- The difference between these two options is most easily seen by zooming in and out with a brush active. The Screen option will keep the brush the same size in relation to the screen, while the World option will keep the brush the same size in relation to the model.
Brush Thumbnails
- Below the brush options, you will see thumbnails of all the brushes currently available. Click on a brush to set it as the active brush and change its properties. You can right click on these thumbnails for additional options, including removing a brush from the palette, creating a new brush, and duplicating the selected brush (which will make a new brush with copied settings).
Notes
- See Paint Displacement for more information on displacement painting.
