Difference between revisions of "Character Modeling by Tony Jung Part 11"
| Line 1: | Line 1: | ||
'''Lower Body and Legs''' | '''Lower Body and Legs''' | ||
| − | 'The lower body is pretty easy and quick to build. There really isn't many complex shapes, its actually simple when you break it down. Formulating the muscle shapes for the lower body and legs are really about edge flow redirection, by connecting, creating or spinning edges. The trick lies in knowing how to tweak the shapes out from the edge flow. For this you really need to have a trained eye as well as refer to good anatomy material. With experience, you will be able to spot how you want your edge to flow and how to tweak the shape, there is no magic here, you need to apply information you gathered and model what you have analyzed. | + | ''The lower body is pretty easy and quick to build. There really isn't many complex shapes, its actually simple when you break it down. Formulating the muscle shapes for the lower body and legs are really about edge flow redirection, by connecting, creating or spinning edges. The trick lies in knowing how to tweak the shapes out from the edge flow. For this you really need to have a trained eye as well as refer to good anatomy material. With experience, you will be able to spot how you want your edge to flow and how to tweak the shape, there is no magic here, you need to apply information you gathered and model what you have analyzed. |
| − | 'Let's begin! | + | ''Let's begin! |
The first thing I need to do is a proportion check. I have a stylistic character, but I still want to maintain correct proportions. The little things like bad proportion could kill the believability of a character, even one that isn't really real. The brute in this case follows the 8-head Length proportion guideline. From the top of the head down to the groin is 4 heads and half of a full body length. I select the boundary edges and extrude down for my groin-lower body region. I select a generous amount of polys and break from the main mesh. Now you don't have to do that, but like usual I prefer to concentrate on the area I am modeling also the upper body doesn't obstruct my view while I am modeling the lower body. I select 4 vertices from the butt region and the groin region and create polygon and repeat again. | The first thing I need to do is a proportion check. I have a stylistic character, but I still want to maintain correct proportions. The little things like bad proportion could kill the believability of a character, even one that isn't really real. The brute in this case follows the 8-head Length proportion guideline. From the top of the head down to the groin is 4 heads and half of a full body length. I select the boundary edges and extrude down for my groin-lower body region. I select a generous amount of polys and break from the main mesh. Now you don't have to do that, but like usual I prefer to concentrate on the area I am modeling also the upper body doesn't obstruct my view while I am modeling the lower body. I select 4 vertices from the butt region and the groin region and create polygon and repeat again. | ||
Revision as of 12:12, 2 July 2008
Lower Body and Legs
The lower body is pretty easy and quick to build. There really isn't many complex shapes, its actually simple when you break it down. Formulating the muscle shapes for the lower body and legs are really about edge flow redirection, by connecting, creating or spinning edges. The trick lies in knowing how to tweak the shapes out from the edge flow. For this you really need to have a trained eye as well as refer to good anatomy material. With experience, you will be able to spot how you want your edge to flow and how to tweak the shape, there is no magic here, you need to apply information you gathered and model what you have analyzed.
Let's begin!
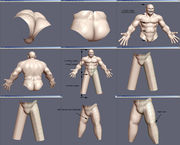
The first thing I need to do is a proportion check. I have a stylistic character, but I still want to maintain correct proportions. The little things like bad proportion could kill the believability of a character, even one that isn't really real. The brute in this case follows the 8-head Length proportion guideline. From the top of the head down to the groin is 4 heads and half of a full body length. I select the boundary edges and extrude down for my groin-lower body region. I select a generous amount of polys and break from the main mesh. Now you don't have to do that, but like usual I prefer to concentrate on the area I am modeling also the upper body doesn't obstruct my view while I am modeling the lower body. I select 4 vertices from the butt region and the groin region and create polygon and repeat again.
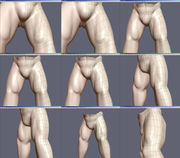
Now I tweak the shape and I get my groin shape. At this point I want to change the topology surrounding what will be the legs to a pole topology. It will also help me form the glut/butt shape. Simple redirection is all I need, by using spin edge and adding in more edge segments so I have enough to shape the leg later on.
More edge redirection by adding a edge which creates a tri and another edge which fans out. I split the tri into a quad, I split the edges right in the lower groin area so I can form a slightly define groin shape.
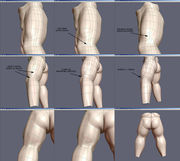
With an extruded LOOP I start forming the shape of the gluts. I do another check against the main mesh. So far so good, I extrude another loop down to the ankle. I make another proportion check. I don't go all the way down to fill up the 1/2 body length guide, I leave enough room for the foot. I add some extra segments in the leg, and I use soft selection tweaking to form the a rough shape of the leg.
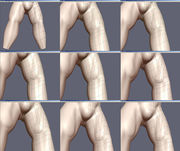
There are 2 quad leg muscles to deal with. I tackle the inner muscle first, since it will be the hardest to form out of all the other muscles on the leg. This sets of images is really about edge flow redirection, spin edges, connect, split and cleaning up any extra edges.
More of the same inner leg muscle. In the end it comes out prefect for the shape, but required some edge flow work to get to that final point. Tweaking the shape as I go and I use Smooth as I tweak.
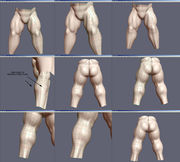
I noticed that the outer quad muscle is a little too thin and needs to be bulked up, so I just rework the edges to extend the bulky shape. I also notice that I have too many extra edges that serves no purpose. Now to get rid of such extra edge, I use spin edge to redirect edges and delete the 2 extra segments of edges from the leg. Some vertices clean-up and smooth to finish up. The muscle behind the leg the hamstrings is another easy shape to form, once again just simple redirection using spin edge and then I connect up the resulting tris and tweak the shape also using smooth.
I add another segment in the middle of the upper leg, because I know I don't have enough edges to get good deformation, so I SELECT RING and CONNECT to create the segment and SMOOTH to smooth out the shape. I go back to the back of the legs, this time I want to work on the calves. Once again simple redirection using spin edge and tweak.
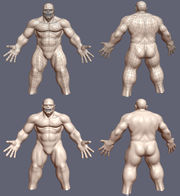
I mirror the lower body, merge back to the main mesh and merge vertices.
Some thoughts:
A lot of times you don't need to create a whole segment of edges. Simple redirection is sometimes all that is required. Think things through first, ask yourself if the segment of edges will serve a purpose to the resulting mesh, and see if some redirection would work better.
If you look at the final wires, you can see that every edge has a purpose. I even had to delete some segments of edges. Keep your mesh efficient and clean, it benefits rendering and deformation.
I used to model the area between the butt and the leg heavier in the past. I have learned since then due to rigging, that it doesn't have to be heavy. It actually hurts rigging proper deformation when it is so densely packed. The key is to have enough, but not too much.
I have recently mapped Spin Edge to the mouse Scroll Wheel Up. Since I use it quite a bit I wanted to key it better. For some reason mapping it to the Scroll Wheel makes it feel nature and quick to use. I also been discovering how effective SMOOTH works while spinning an edge and tweaking. I have mapped it to the Scroll Wheel Down. Smooth saves me more time while tweaking, but I need to smooth a few times at least to get the desired result, so what would be more nature than scrolling the repeating action in a more nature manner.
Next and last part will be building the foot.
Back to Part 10 | Go to Part 12
Text and Images Copyright © 2004 Tony Jung.
