Character Modeling by Tony Jung Part 2
The Neck
Now that I have a nice simple topology laid out for the head, I want to work on the neck.
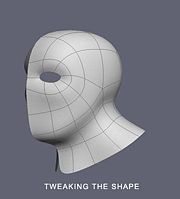
I simply extrude out the neck portion and start adding some definition by creating new loops of edges and tweaking the shape.
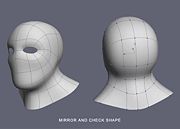
At this point I wanted to see how my overall shape was working, so I deleted my instance mirrored geometry and I mirrored the shape and worked on some areas like the back of the head.
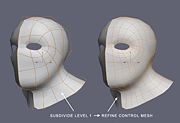
I deleted half the head again and recreated an instance mirror. Also at this point I subdivided the head to level 1 and refined control mesh. The reason I went this route, was because I needed to start adding definition to the mesh. Using refine control mesh comes in handy, to give me the added definition in one shot. Another added benefit of using RCM(Refine Control Mesh) is that it gives you the actual smooth version, which if you did it by hand, would take some time. RCM is also a great tool to use when making hard surface models, like cars. For example, once you have your nice curvy shaped car, but need to add detail, adding an edge would most likely warp your shape, and you would have to tweak it to get it back into shape, which could prove daunting and frustrating at times. RCM in this case would save your smooth shape while giving you the needed higher definition, so you could add details to your car model.
Here I tweak out the shape using soft selection as well as tweaking some points.
Some thoughts: I am not really following a set procedure at this point, it is more about roughing out the shape and I need enough definition in my mesh, while still keeping it simple. So, if I need to rework the topology in some spots, it won't too difficult.
Text and Images Copyright © 2004 Tony Jung.


