Difference between revisions of "Character Modeling by Tony Jung Part 3"
| Line 1: | Line 1: | ||
| − | + | '''Beginning the Upper Body''' | |
Needs more upper body, so I extrude a select path down and tweak the shape out. | Needs more upper body, so I extrude a select path down and tweak the shape out. | ||
| − | [Image:Tony_jung_tutorial_3_001.jpg|thumbnail|none]] | + | [[Image:Tony_jung_tutorial_3_001.jpg|thumbnail|none]] |
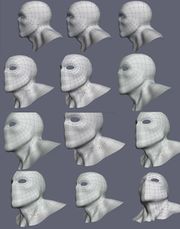
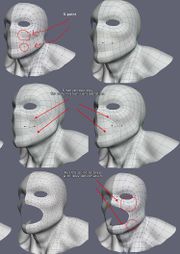
In this series of images, what I am doing is to work in some topology. What I have currently, only goes in 2 direction, but I need my topology also going in a 3rd direction. In these shots, you can see how I am reworking the topology to also include the muscle form that runs from the back of the jaw to the upper mid-point of the chest. Now, this isn't the fastest way to accomplish my goal, but I thought it might be beneficial to show some edge work. | In this series of images, what I am doing is to work in some topology. What I have currently, only goes in 2 direction, but I need my topology also going in a 3rd direction. In these shots, you can see how I am reworking the topology to also include the muscle form that runs from the back of the jaw to the upper mid-point of the chest. Now, this isn't the fastest way to accomplish my goal, but I thought it might be beneficial to show some edge work. | ||
| − | [Image:Tony_jung_tutorial_3_002.jpg|thumbnail|none]] | + | [[Image:Tony_jung_tutorial_3_002.jpg|thumbnail|none]] |
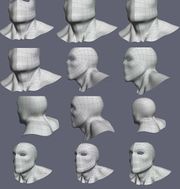
After I have established the reworked topology, I want to clean-up the surrounding edges to follow in the same direction as the original topology. | After I have established the reworked topology, I want to clean-up the surrounding edges to follow in the same direction as the original topology. | ||
| − | [Image:Tony_jung_tutorial_3_003.jpg|thumbnail|none]] | + | [[Image:Tony_jung_tutorial_3_003.jpg|thumbnail|none]] |
More of the same, but you can see in the last image, that now my topology runs in the direction that I wanted. | More of the same, but you can see in the last image, that now my topology runs in the direction that I wanted. | ||
| − | [Image:Tony_jung_tutorial_3_004.jpg|thumbnail|none]] | + | [[Image:Tony_jung_tutorial_3_004.jpg|thumbnail|none]] |
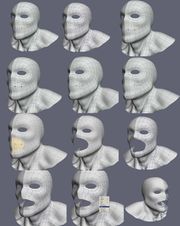
Here is another example that I wanted to demo, for a circle pole topology in a square area of your model. I create the circle pattern by connecting edges and vertices. I bevel the newly create edge loop. I like using bevel in this type of situation, because, with pole topologies you always end up needing to add more circle edges, you could extrude out or cut other surrounding edges. With bevel I get both with just the one tool. After that, I just extrude the inner edges foward and scale them in(I changed the position of the manipulator for the select)and convert the selection to vertices and use the new SMOOTH function to average out the vertices, a very helpfull tools, something you will see me use more when I do more sculpting with soft selection. And finally I tweak the vertices to get my shape. | Here is another example that I wanted to demo, for a circle pole topology in a square area of your model. I create the circle pattern by connecting edges and vertices. I bevel the newly create edge loop. I like using bevel in this type of situation, because, with pole topologies you always end up needing to add more circle edges, you could extrude out or cut other surrounding edges. With bevel I get both with just the one tool. After that, I just extrude the inner edges foward and scale them in(I changed the position of the manipulator for the select)and convert the selection to vertices and use the new SMOOTH function to average out the vertices, a very helpfull tools, something you will see me use more when I do more sculpting with soft selection. And finally I tweak the vertices to get my shape. | ||
| − | [Image:Tony_jung_tutorial_3_005.jpg|thumbnail|none]] | + | [[Image:Tony_jung_tutorial_3_005.jpg|thumbnail|none]] |
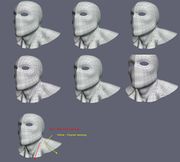
Notes: I didn't need to rework the topology for the neck if I plan on using the topology brush later on, but I wanted to show some of the work that goes into creating topology, and also my thought process. Generally, at that point, when I need to add in a topology, I have to see how the topology is flowing and what changes I need to add in. I like to break things down to simple steps in my head this way. So, in one of the images, I have yellow and red arrows with what direction things were going. I try to follow the muscle in this regard as much as possible. The best way for anybody to know what to work out for topology, is for them to refer to any good artist anatomy book, I always have varies ones alround, man and animals. | Notes: I didn't need to rework the topology for the neck if I plan on using the topology brush later on, but I wanted to show some of the work that goes into creating topology, and also my thought process. Generally, at that point, when I need to add in a topology, I have to see how the topology is flowing and what changes I need to add in. I like to break things down to simple steps in my head this way. So, in one of the images, I have yellow and red arrows with what direction things were going. I try to follow the muscle in this regard as much as possible. The best way for anybody to know what to work out for topology, is for them to refer to any good artist anatomy book, I always have varies ones alround, man and animals. | ||
| Line 22: | Line 22: | ||
Another of the reason I choosed to bevel on the circle topology I created was to push any possibility of a 5-point further away as you can see on the following image: | Another of the reason I choosed to bevel on the circle topology I created was to push any possibility of a 5-point further away as you can see on the following image: | ||
| − | [Image:Tony_jung_tutorial_3_006.jpg|thumbnail|none]] | + | [[Image:Tony_jung_tutorial_3_006.jpg|thumbnail|none]] |
Revision as of 15:04, 26 June 2008
Beginning the Upper Body Needs more upper body, so I extrude a select path down and tweak the shape out.
In this series of images, what I am doing is to work in some topology. What I have currently, only goes in 2 direction, but I need my topology also going in a 3rd direction. In these shots, you can see how I am reworking the topology to also include the muscle form that runs from the back of the jaw to the upper mid-point of the chest. Now, this isn't the fastest way to accomplish my goal, but I thought it might be beneficial to show some edge work.
After I have established the reworked topology, I want to clean-up the surrounding edges to follow in the same direction as the original topology.
More of the same, but you can see in the last image, that now my topology runs in the direction that I wanted.
Here is another example that I wanted to demo, for a circle pole topology in a square area of your model. I create the circle pattern by connecting edges and vertices. I bevel the newly create edge loop. I like using bevel in this type of situation, because, with pole topologies you always end up needing to add more circle edges, you could extrude out or cut other surrounding edges. With bevel I get both with just the one tool. After that, I just extrude the inner edges foward and scale them in(I changed the position of the manipulator for the select)and convert the selection to vertices and use the new SMOOTH function to average out the vertices, a very helpfull tools, something you will see me use more when I do more sculpting with soft selection. And finally I tweak the vertices to get my shape.
Notes: I didn't need to rework the topology for the neck if I plan on using the topology brush later on, but I wanted to show some of the work that goes into creating topology, and also my thought process. Generally, at that point, when I need to add in a topology, I have to see how the topology is flowing and what changes I need to add in. I like to break things down to simple steps in my head this way. So, in one of the images, I have yellow and red arrows with what direction things were going. I try to follow the muscle in this regard as much as possible. The best way for anybody to know what to work out for topology, is for them to refer to any good artist anatomy book, I always have varies ones alround, man and animals.
Another thing I wanted to bring up is the concept of pole topology. Some of the most used pole topology is for areas like the eyes, mouth, ears and so on. Creating good pole topology can sometimes be tricky, if you try to create one similiar to the grid like pattern I added the mouth pole on, you might have to rework the surrounding mesh. In my case there were just a little reworking. It is generally best to get these type of topology in early or in areas that are not too dense or complicated.
An important issue of 5-point. 5-point occurs in your mesh when you have 5 edges converging into one vertex. 5-point can cause problems during deformation, causing unslightly creases where you don't want it. For this reason, it is a good idea to push the 5-points to area with no or less deformation.
Another of the reason I choosed to bevel on the circle topology I created was to push any possibility of a 5-point further away as you can see on the following image:
Text and Images Copyright © 2004 Tony Jung.

