Difference between revisions of "Ear Modeling by 3dEE"
From Nevercenter 3D Modeling Wiki
(New page: '''This is an intermediate level tutorial on modeling an ear.''' In the first image I had set a reference viewport image and created a plane. Ghost Shaded the plane so I can see through ...) |
|||
| Line 5: | Line 5: | ||
From there on make a selection as highlited on an image and follow the commands listed at the bottom. | From there on make a selection as highlited on an image and follow the commands listed at the bottom. | ||
[[Image:EarTutorial by 3dEE.jpg|thumbnail|none]] | [[Image:EarTutorial by 3dEE.jpg|thumbnail|none]] | ||
| − | For the final stitching preparation it is more appropriate to use silo2 option of Surface Snapping. This was created with silo1.4 | + | For the final stitching preparation it is more appropriate to use silo2 option of Surface Snapping. This was created with silo1.4 Snap Manipulator was used. |
{{Common Page}} | {{Common Page}} | ||
Revision as of 19:53, 7 August 2008
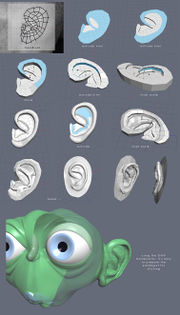
This is an intermediate level tutorial on modeling an ear.
In the first image I had set a reference viewport image and created a plane. Ghost Shaded the plane so I can see through it then used Topology Brush to create the initial geometry seen in image 2.
From there on make a selection as highlited on an image and follow the commands listed at the bottom.
For the final stitching preparation it is more appropriate to use silo2 option of Surface Snapping. This was created with silo1.4 Snap Manipulator was used.
