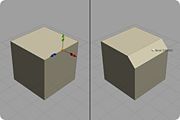
Bevel
Default Shortcut: B
Menu Path: Modify > Bevel
Description
The Bevel tool is used for creating a bevel along selected edges or the edges of selected faces or vertices. It is akin to slicing off the corner where two faces meet, revealing a new face and two edges where one used to be. It is frequently used, particularly with hard surface modeling, to add a slight rounding effect along the corners of an object.
The bevel amount can be controlled interactively using the tool manipulator (or dragging anywhere on the screen while the tool manipulator is active) or numerically in the options dialog. Pressing Enter or right-clicking will complete and exit the tool.
Options
Default Amount
- Determines how much to offset the bevel when the command is called. When used with the tool already active, it is equivalent to dragging the manipulator handle for this command to the specified value, and allows you to enter precise values for the current operation. This amount will also be applied each time you use the command in the future. Set it to 0 if you want no default adjustment.
Sticky Functionality
Press and hold the keyboard shortcut for this command to temporarily activate its manipulator, and move your mouse (no clicking necessary) to adjust the amount. Release the shortcut key to exit the tool. This allows you to model more quickly since you do not need to manually exit the tool.
Context Sensitivity
This command can be applied to faces, edges, vertices, and objects.
Notes
- On a subdivided object, bevels can be used to sharpen edges and corners, because it creates geometry which is close together. You can see the result interactively by adjusting the bevel amount while the shape is subdivided.
